
DJI Inspire 2 Review: A Complete Drone for Professional Filmmakers
So, you’re looking to get into making those awesome aerial videos, huh? Maybe you’ve seen some incredible shots online and thought, ‘I want to do that!’ Well, the DJI Inspire 2 is a pretty serious tool for that kind of work. It’s not just a toy; it’s something professionals use to get those sweeping, cinematic views. This guide is all about helping you understand how to get the most out of the DJI Inspire 2, from flying it right to making your footage look amazing in editing. We’ll cover the basics and some more advanced stuff too, so you can start creating your own professional-looking aerial films.
Key Takeaways
- The DJI Inspire 2 is a powerful drone built for professional aerial cinematography, offering advanced features for filmmakers.
- Mastering flight controls, like fine-tuning gain, expo, and yaw, along with proper camera settings, is vital for smooth, cinematic shots.
- Capturing compelling footage involves thoughtful framing, using natural light like the golden hour, and employing ND filters for exposure control.
- A well-defined post-production workflow, including converting raw files and applying LUTs, is necessary for achieving a professional look.
- Advanced techniques such as reveal shots, top-down perspectives, and integrating aerial footage with ground shots help tell a better story.
Understanding The DJI Inspire 2 For Aerial Cinematography
The DJI Inspire 2: A Professional Tool
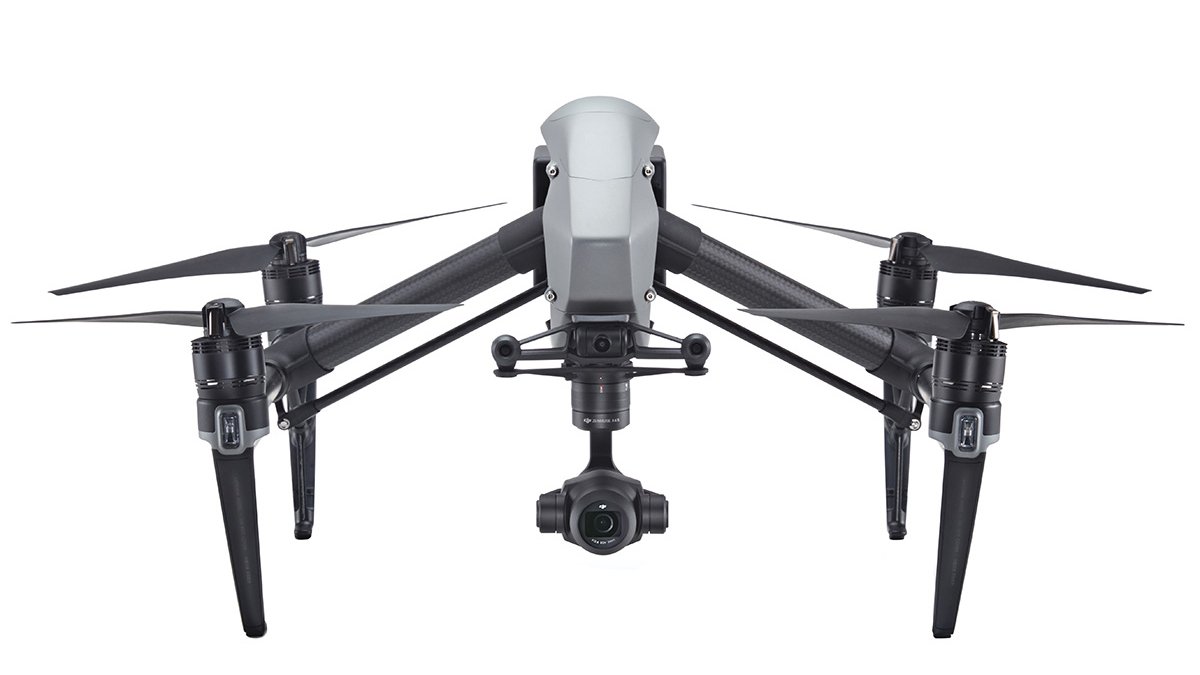
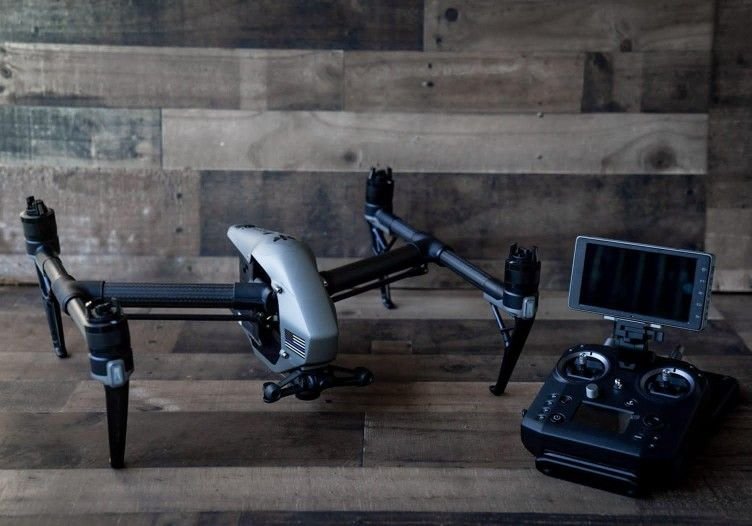
The DJI Inspire 2 isn’t just another drone; it’s a serious piece of kit for anyone looking to capture professional-level aerial video. Think of it as a flying camera platform built for filmmakers, not just hobbyists. It’s designed to handle demanding shoots and produce footage that can stand up against traditional cinema cameras. This drone offers a significant step up in capability and image quality for aerial work. When you’re aiming for that polished, cinematic look, the Inspire 2 provides the tools to get you there.
You can check current availability and pricing on the DJI Inspire 2 product page.
Key Features for Cinematographers
What makes the Inspire 2 stand out for video work? It comes down to a few key areas:
- Camera Options: It supports interchangeable cameras, like the Zenmuse X4S and X5S, which are built for image quality. This means you can choose the lens and sensor that best fits your project’s needs.
- Flight Performance: It’s built for stability and precision. The dual-battery system means longer flight times, and its robust design can handle various weather conditions.
- Intelligent Flight Modes: Features like ActiveTrack and Point of Interest allow the drone to follow subjects or circle them automatically, freeing you up to focus on framing and camera movement.
- Video Formats: It can record in high-resolution formats like 5.2K and in RAW, giving you maximum flexibility in post-production.
Inspire 2 vs. Inspire 1: An Evolution
If you’re familiar with the Inspire 1, the Inspire 2 represents a clear evolution. While the Inspire 1 was a groundbreaking drone for its time, the Inspire 2 takes things further.
| Feature | DJI Inspire 1 | DJI Inspire 2 |
|---|---|---|
| Max Resolution | 4K | 5.2K |
| Video Codec | H.264/H.265 | H.264/H.265, RAW |
| Camera System | Fixed or interchangeable (X3, X5, X5R) | Interchangeable (X4S, X5S, X7) |
| Flight Time | Approx. 18 minutes | Approx. 27 minutes (with X5S) |
| Obstacle Sensing | Front sensors only | Forward, downward, and upward sensors |
| Dual Battery | No | Yes |
The Inspire 2 was built with the idea of giving filmmakers more control and better image quality. It’s not just about getting a shot from the air; it’s about getting a cinematic shot from the air. This means better sensors, more recording options, and a more reliable flight system to handle the pressure of professional shoots.
Mastering Flight Controls and Camera Settings
Getting those smooth, professional-looking shots with your DJI Inspire 2 isn’t just about pointing and shooting. It really comes down to understanding how the drone responds to your commands and how to tweak its settings for cinematic results. Many pilots, even with powerful drones, end up with shaky footage because they haven’t dialed in the controls. It’s like trying to paint a masterpiece with a brush that’s too stiff or too loose – you need that perfect feel.
Fine-Tuning Gain, Expo, and Yaw
These three settings – Gain, Expo, and Yaw – are your secret sauce for precise flight control. Think of them as the knobs that let you sculpt how the drone moves. Mastering these controls is what separates amateur footage from professional aerial cinematography.
- Expo (Exponential): This affects how the drone reacts to your stick movements. Increasing expo makes the drone less sensitive right at the center of the stick, allowing for tiny, delicate adjustments. As you push the stick further, the response gets stronger. This is fantastic for smooth, flowing movements.
- Gain: This setting influences the drone’s stabilization system. Higher gain means a more stable, locked-in feel, which is great for steady shots. Lower gain makes the drone more responsive and agile, useful if you need to make quicker adjustments or fly in windy conditions.
- Yaw: This controls how fast the drone rotates around its vertical axis. Adjusting yaw sensitivity is key for controlled turns. Decreasing it can lead to smoother, more deliberate rotations, perfect for framing a subject without jerky movements. You can find these settings within the DJI Fly App under the “Control” menu, specifically in “Gain & Expo Tuning.”
Experimenting with these settings is vital. What works for one pilot or one situation might not be ideal for another. Take the time to test different values in a safe, open area to get a feel for how they change the drone’s behavior. You’ll be surprised at the difference it makes.
Essential Camera Settings for Cinematic Footage
Beyond flight controls, the camera settings on your Inspire 2 are just as important. Getting the right look starts in-camera.
- Frame Rate: For a cinematic feel, shooting at 24 or 30 frames per second (fps) is standard. If you plan on slowing footage down in post-production for a slow-motion effect, consider shooting at higher frame rates like 60 fps or even 120 fps (depending on the camera module you’re using).
- Shutter Speed: To achieve natural motion blur, follow the 180-degree rule. Your shutter speed should ideally be double your frame rate. So, if you’re shooting at 30 fps, set your shutter speed to 1/60th of a second. This creates that smooth, filmic look.
- Color Profile: While shooting in D-Log (or D-Cinelike) gives you the most flexibility in post-production for color grading, it requires more work. For a quicker workflow, you can experiment with other profiles, but always aim for a neutral look initially if you plan to grade.
Achieving Smooth and Deliberate Camera Movements
Smooth camera movements are the hallmark of professional drone work. It’s not just about flying straight; it’s about intention.
- Practice Basic Maneuvers: Before attempting complex shots, get comfortable with simple movements like smooth forward/backward slides, side-to-side drifts, and controlled rotations. Practicing these basic maneuvers in a safe, open area will build your confidence and control [55f4].
- Use Gentle Inputs: Avoid sudden, sharp movements on the control sticks. Think of it like driving a car – you wouldn’t slam on the brakes or yank the steering wheel. Gentle, gradual inputs translate to smooth on-screen motion.
- Combine Movements: Once you’re comfortable with individual movements, start combining them. For example, a slow forward movement combined with a gentle yaw can create a dynamic reveal shot. The key is to make these combinations feel natural and unhurried.
| Setting | Impact on Movement |
|---|---|
| High Expo | Smoother, more controlled movements with small inputs |
| Low Expo | More responsive, quicker movements |
| High Gain | More stable, less reactive to small disturbances |
| Low Gain | More agile, quicker to respond to control inputs |
| Decreased Yaw | Slower, more controlled rotations for precise framing |
| Increased Yaw | Faster, more dynamic rotations for sweeping shots |
Capturing Cinematic Footage with the DJI Inspire 2
Alright, so you’ve got the DJI Inspire 2, and you’re ready to start shooting some seriously cool aerial video. It’s not just about pointing the camera and hitting record, though. To make your footage look like it belongs in a movie, you need to think about a few things before you even take off.
Leveraging Golden Hour Lighting
This is a big one. You know that time right after sunrise or before sunset? That’s golden hour. The light is softer, warmer, and it just makes everything look better. Seriously, try to schedule your shoots then if you can. It makes a huge difference in how professional your footage appears, giving it a nice, rich look without you having to do much in post-production. It’s like nature’s built-in Instagram filter, but way better.
Framing Techniques: Rule of Thirds and Foreground Elements
Think about how you’re composing your shots. A simple trick is the rule of thirds. Imagine dividing your screen into nine equal parts with two horizontal and two vertical lines. Placing your subject along these lines or at their intersections often makes for a more balanced and interesting image. Also, don’t forget about foreground elements. Having something in the front of your shot – like trees, a building, or even a fence – can add depth and make the aerial view feel more immersive. It gives the viewer something to connect with as they look into the scene.
Varying Heights and Angles for Visual Interest
Don’t get stuck flying at the same altitude or pointing the camera straight down. Mix it up! Try a low, sweeping shot that follows a road, then pull back and go high to show the whole landscape. Changing your perspective keeps the viewer engaged. A top-down view can be dramatic, while a shot from a lower angle looking up at a subject can create a sense of power or scale. The key is to think about what story you’re trying to tell with each shot and choose the height and angle that best supports it.
Utilizing ND Filters for Exposure Control
On bright, sunny days, your footage can easily get overexposed, looking washed out. That’s where Neutral Density (ND) filters come in. They’re like sunglasses for your drone’s camera. They reduce the amount of light entering the lens, allowing you to use slower shutter speeds for smoother motion blur (especially important for cinematic movement) and maintain proper exposure without blowing out highlights. You’ll want a few different strengths depending on the light conditions.
When you’re out shooting, remember that the Inspire 2 is a tool, but your creative decisions are what truly make the footage shine. Think about the mood you want to create and how the light, composition, and movement all work together to achieve that. It takes practice, but the results are worth it.
Here’s a quick rundown of what to keep in mind:
- Golden Hour: Shoot during the hour after sunrise or before sunset for warm, soft light.
- Rule of Thirds: Place your subject off-center for more dynamic compositions.
- Foreground Elements: Add depth by including objects in the front of your frame.
- Vary Shots: Mix up altitudes and camera angles to maintain viewer interest.
- ND Filters: Use them on bright days to control exposure and achieve proper motion blur.
Post-Production Workflow for Inspire 2 Footage
So you’ve captured some amazing aerial shots with your DJI Inspire 2, but now it’s time to make them shine in the edit. Working with RAW files, especially from a drone, can be a bit tricky if you’re not used to it. The goal here is to get your footage into a workable format that allows for easy color grading and matching.
Converting Inspire 2 Raw Files
When you shoot in RAW mode on the Inspire 2 (which gives you that 5.2K resolution), you end up with .dng sequences. These aren’t directly editable like standard video files. You’ll need to convert them. A common approach is to convert these RAW files into a Log gamma profile. This preserves the most information and gives you the most flexibility later on. Some people prefer to shoot in Apple ProRes with D-Log if they want to skip this conversion step, which is a good option if you’re not aiming for the absolute maximum in post. For those shooting RAW, you have a couple of main paths.
- After Effects: This method offers the highest quality. You import your .cdng sequences, and the Camera Raw app opens for each. You can then apply conversion presets to get a Log gamma. Be warned, though, this process can take a really long time, sometimes days for a decent amount of footage. It also helps fix lens issues like distortion and chromatic aberration.
- DaVinci Resolve: This is a faster option. You can import your RAW files and set the color space and gamma to “Blackmagic Design Film.” While quicker, it doesn’t fix lens defects and might blow out highlights a bit more than the After Effects route. You can also use specific LUTs here to get closer to certain looks.
Achieving Neutral Gamma and Color
Regardless of how you convert your RAW files, the aim is to get a neutral Log gamma. This means the footage will look flat and desaturated, which is exactly what you want before grading. It’s like a blank canvas. Trying to color correct directly from the converted RAW files without first achieving this neutral state can lead to muddy colors and lost detail. It’s about getting the footage to a consistent baseline so that your color grading decisions are applied effectively.
The key is to treat your drone footage like any other professional camera source. Proper conversion and a neutral starting point make all the difference in the final look.
Applying LUTs for Efficient Grading
Once you have your footage in a Log gamma, you can start applying Look-Up Tables (LUTs). LUTs are essentially color presets that can quickly give your footage a specific style or help match it to other cameras. For example, you might use a LUT designed to mimic the look of Arri Alexa Log C. This is where shooting in D-Log on the Inspire 2 can be helpful, as many LUTs are designed with that profile in mind. You can apply these LUTs directly in your editing software, like Premiere Pro’s Lumetri Color panel or DaVinci Resolve’s color tab. This speeds up the grading process significantly.
Creating Proxies for Editing
Working with high-resolution RAW files or even ProRes footage from the Inspire 2 can be tough on your computer, especially during editing. To make the editing process smoother, it’s a good idea to create proxy files. Proxies are smaller, lower-resolution versions of your original footage. Your editing software can then use these proxies for playback and editing, which is much less demanding on your system.
When you’re ready to export your final project, the software will automatically link back to the original high-resolution files for the best possible quality. This is a standard practice in professional video editing and makes a huge difference in workflow efficiency. It’s worth noting that the drone industry is facing some regulatory changes, and it’s wise to stay informed about options for DJI drone alternatives if needed.
Advanced DJI Inspire 2 Cinematography Techniques
So, you’ve got the DJI Inspire 2 humming and you’re ready to move beyond basic shots. This is where things get really interesting, turning your aerial footage from just pretty pictures into compelling visual storytelling. It’s all about intentional movement and perspective.
Reveal Shots: Tilt-Up and Rise
Reveal shots are fantastic for building anticipation. A tilt-up starts with the camera looking down, maybe at the ground or water, and then smoothly tilts up to show a wider landscape or a subject. It’s like peeling back a curtain. The rise shot is similar but involves the drone physically moving upwards. You might start low, flying towards a building or a mountain, and then ascend above it, showing what’s beyond. These movements add a sense of discovery and scale.
Top-Down Perspectives and Fly-Overs
Shooting straight down, or a top-down perspective, gives a unique, almost god-like view. You can track a subject from directly above, or even rotate the drone while staying centered to create a dizzying effect. A fly-over shot, on the other hand, involves flying towards a subject from behind and above, tilting the camera down to keep the subject framed as you pass over it. It’s a classic move that works well for establishing a scene or showing movement across a landscape.
Integrating Aerial Shots with Ground Footage
This is where the magic really happens. Your drone shots shouldn’t feel separate from the rest of your film. Think about how the aerial perspective can complement what’s happening on the ground. If you have a character walking towards a distant landmark, a drone shot pulling back from them as they approach the landmark can really tie the scene together. It’s about creating a visual flow that feels natural. You can use similar movements, like a push-in from the air that matches a push-in on the ground, to create a sense of continuity. For beginners looking to get started with drone videography, the DJI Mini 4K offers a good balance of features and ease of use.
Storytelling Through Drone Movements
Every movement should have a purpose. Are you trying to show isolation? Speed? Grandeur? A slow, deliberate pull-back from a character can emphasize their solitude, while a fast, low-altitude fly-over might convey urgency. Think about the emotional impact of each shot. Don’t just fly the drone because you can; make it serve the narrative. Consider these common drone movements:
- Push In/Pull Out: Moving towards or away from a subject.
- Tracking Shots: Following a subject from behind, in front, or the side.
- Aerial Pan: Rotating the drone horizontally to reveal a scene.
- Orbit: Circling a subject.
- Pedestal: Moving the drone straight up or down.
- Reveal: Using tilt or rise to show something new.
- Top-Down: Shooting directly from above.
- Fly-Over: Passing over a subject.
The key is to use these movements intentionally. They aren’t just fancy tricks; they are tools to help you communicate your story visually. Think about what you want the audience to feel and see, and choose the movement that best achieves that goal. Avoid making drone shots feel tacked on; they should feel like an organic part of the film’s visual language.
Mastering these advanced techniques takes practice, but the results can dramatically increase the cinematic quality of your productions. It’s about making the drone an extension of your storytelling vision.
The DJI Inspire 2 in Professional Productions
Applications in Film and Television
The DJI Inspire 2 has really changed the game for filmmakers, big and small. It’s not just for hobbyists anymore; it’s a serious tool you see on professional sets. Think about those sweeping shots in movies or TV shows that just pull you into the scene – a lot of that is thanks to drones like the Inspire 2. It lets directors get perspectives that were either impossible or incredibly expensive to achieve before. We’re talking about dramatic reveals, following fast-moving action, or just getting that epic establishing shot of a location. It’s become a go-to for adding that cinematic flair.
Enhancing Commercials and Marketing Content
When it comes to commercials and marketing, grabbing attention is everything. The Inspire 2 helps brands do just that. Imagine a car commercial with the drone smoothly flying alongside a speeding vehicle, or a real estate video showcasing a property from above, highlighting its surroundings. It makes products and locations look more dynamic and appealing. The ability to capture smooth, high-quality footage from unique angles makes marketing materials stand out significantly. It’s a cost-effective way to produce polished, professional-looking ads that can really make a product pop.
Elevating Documentary Storytelling
Documentaries often aim to tell a story with impact, and aerial footage from the Inspire 2 can add a whole new layer to that narrative. It can show the scale of a subject, like a vast landscape being explored or the impact of a particular event on an environment. It can also be used to follow subjects as they move through their world, giving viewers a sense of place and context they wouldn’t get otherwise. This kind of footage can make the story feel more immediate and real.
Using the Inspire 2 allows documentary filmmakers to visually represent complex ideas or vast environments in a way that grounds the narrative and connects the audience more deeply with the subject matter.
Here’s a look at how the Inspire 2 fits into different production types:
- Film & TV: Used for establishing shots, action sequences, and dramatic reveals.
- Commercials: Ideal for product showcases, location highlights, and dynamic advertising.
- Documentaries: Great for showing scale, context, and following subjects in their environment.
- Event Coverage: Capturing wide views of festivals, concerts, or sporting events.
It’s really about how you use the tool to serve the story you’re trying to tell. The Inspire 2 just gives you more ways to do that visually.
Wrapping Up Your Aerial Journey
So, we’ve covered a lot about getting those amazing shots with the DJI Inspire 2. It’s a powerful tool, no doubt, and with a bit of practice, you can really make your footage stand out. Remember to keep those movements smooth, play with the light, and don’t forget to tweak your settings. It might seem like a lot at first, but the more you fly and shoot, the more natural it becomes. Keep experimenting, keep learning, and most importantly, have fun out there capturing those incredible aerial perspectives. Safe flying!
Frequently Asked Questions
What makes the DJI Inspire 2 good for filming from the sky?
The DJI Inspire 2 is a powerful tool for making movies from the air. It has great cameras and features that help you get smooth, professional-looking shots. It’s built for serious filmmakers who need top quality and control.
How can I make my drone videos look more like a movie?
To make your drone videos look cinematic, try flying slowly and smoothly. Film during the ‘golden hour’ when the light is warm and soft. Think about how you frame your shots, like using the rule of thirds, and change up your camera angles and heights to keep things interesting.
What are some cool camera moves I can do with the Inspire 2?
You can do many cool moves! Try a ‘reveal shot’ where you fly up or tilt the camera to show something new. A ‘top-down shot’ looks straight down, and a ‘fly-over’ goes above your subject. These moves can make your story more exciting.
How do I get the best colors and quality from my Inspire 2 footage?
When you film in RAW format with the Inspire 2, you might need to change the files a bit to get the best colors. Using special tools or settings can help make the colors look natural, similar to how professional movies look, so you can easily edit them later.
Can I mix drone shots with regular camera footage?
Yes, you absolutely can! To make it look smooth, try to match the colors and how the camera moves between your drone shots and the footage from your regular camera. Using editing tricks can help blend them together so it looks like one continuous scene.
Where are drones like the Inspire 2 used in real movie projects?
Drones like the Inspire 2 are used in many professional projects! They help make movies and TV shows look amazing with incredible aerial views. They’re also used a lot in commercials, marketing videos, and documentaries to tell stories in a more powerful way.